- Install fresh windows 7 on a small capacity hard drive (40GB)
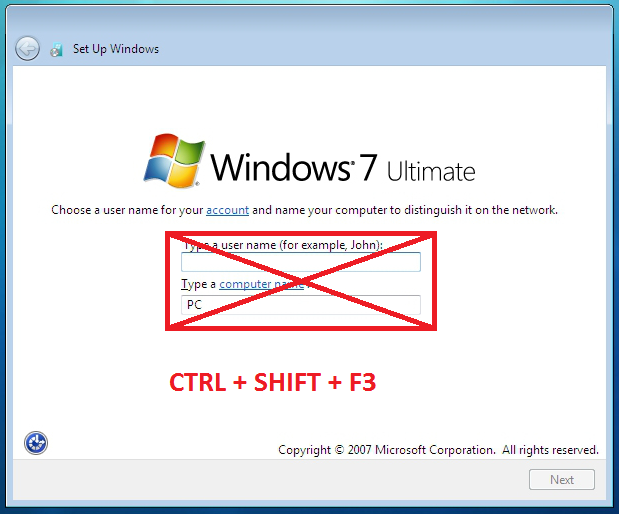
- When it prompts you to enter the username & computer name – do not enter username & computer name. Instead press CTRL + SHIFT + F3. This reboots the OS and enter Audit mode using the built-in administrator account.
- After the system reboots and logged in as administrator, close sysprep windows and we can now customize windows. First we can add desktop icons. Also include Internet Explorer icon.
- Change User Account Control Settings (UAC). We want to disable dim my desktop which greatly slows down the computer. Select never notify or notify me…. my computer (do not dim my desktop).
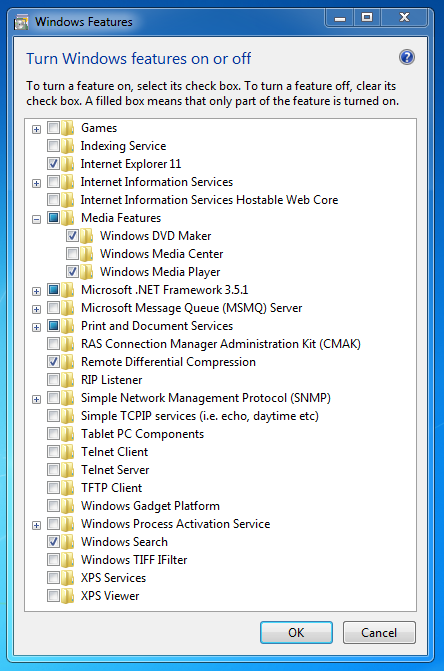
- Turn off unnecessary windows features. See screenshot on what to leave checked. More info here.
- Disable unnecessary visual effects.

- Install Microsoft Security Essentials. WinKey + R to open Run command. Type \\192.168.100.215\drivers\WINDOWS7DRIVERS\SECURITY (enter credentials) and run SECURITY ESSENTIALS.exe
- Open taskbar and start menu properties and do the following:
- Open device manager (devmgmt.msc) See image below. The purpose of this is to set \\192.168.100.215\drivers\WINDOWS7DRIVERS\ as the default location to find the INF drivers. You do not need to install missing drivers.
- Open \\192.168.100.215\drivers\SysprepFiles_KN and copy the following files:
- MPshortcut.vbs (to C:\Windows\Setup)
- extendpart.txt (to C:\Windows\Setup)
- RUN AS ADMIN.bat (to Desktop)
- answer.xml (to C:\Windows\System32\sysprep)
- If all windows updates are installed, shut down the system. Use clonezilla to create an image from the hard drive. Name this to WIN7-FRESH-AUDIT-MODE-DATE. We created this image just in case you need to rebuild the image. We can now start the system which will enter the audit mode again. Close the sysprep dialog box on startup.
- Open command prompt (WinKey+R > cmd) and change directory to the sysprep folder (cd C:\Windows\System32\sysprep). Making sure that answer.xml is in the same folder, run the following command:
-
sysprep.exe /oobe /generalize /shutdown /unattend:answer.xml
-
- After the sysprep is done and the system shutdown, run clonezilla to create your windows 7 image. Done!


WHAT’S INSIDE ANSWER.XML?
<component name=”Microsoft-Windows-Security-SPP” processorArchitecture=”x86″ publicKeyToken=”31bf3856ad364e35″ language=”neutral” versionScope=”nonSxS” xmlns:wcm=”http://schemas.microsoft.com/WMIConfig/2002/State” xmlns:xsi=”http://www.w3.org/2001/XMLSchema-instance”>
<SkipRearm>1</SkipRearm>
</component>
Windows has a limit of maximum 3 syspreps. After 3 sysprep on the same Windows, sysprep will fail. The only disadvantage of this is whenever you load the windows 7 image onto a hard drive, the activation day period is not 30 days. The counter started the day you made the image. (Example: This image was made June 1. You then cloned this image into a new hard drive on June 20. Windows 7 trial will only have 10 days left.) A fix was included in the RUN AS ADMIN batch file which resets/rearm the activation key. That will return the trial to 30 days after the restart.
<component name=”Microsoft-Windows-International-Core” processorArchitecture=”x86″ publicKeyToken=”31bf3856ad364e35″ language=”neutral” versionScope=”nonSxS” xmlns:wcm=”http://schemas.microsoft.com/WMIConfig/2002/State” xmlns:xsi=”http://www.w3.org/2001/XMLSchema-instance”>
<InputLocale>en-US</InputLocale>
<SystemLocale>en-US</SystemLocale>
<UILanguage>en-US</UILanguage>
<UILanguageFallback>en-US</UILanguageFallback>
<UserLocale>en-US</UserLocale>
</component>
This part skips the location and language prompt on Windows Setup.
<OOBE>
<HideEULAPage>true</HideEULAPage>
<NetworkLocation>Work</NetworkLocation>
<HideWirelessSetupInOOBE>true</HideWirelessSetupInOOBE>
<ProtectYourPC>1</ProtectYourPC>
</OOBE>
This part skips the licence agreement, network location, skip connect to wireless setup, and chooses Install Windows Updates Automatically (Recommended)
<TimeZone>Central Standard Time</TimeZone>
Skips the timezone location setup.
<UserAccounts>
<LocalAccounts>
<LocalAccount wcm:action=”add”>
<Password>
<Value>UABhAHMAcwB3AG8AcgBkAA==</Value>
<PlainText>false</PlainText>
</Password>
<Description>CFSL</Description>
<DisplayName>CFSL</DisplayName>
<Group>Administrators</Group>
<Name>CFSL</Name>
</LocalAccount>
</LocalAccounts>
</UserAccounts>
This skips the prompt to enter a username and password on Windows setup. The complicated value inside <password></password> means blank password.
<component name=”Microsoft-Windows-Shell-Setup” processorArchitecture=”x86″ publicKeyToken=”31bf3856ad364e35″ language=”neutral” versionScope=”nonSxS” xmlns:wcm=”http://schemas.microsoft.com/WMIConfig/2002/State” xmlns:xsi=”http://www.w3.org/2001/XMLSchema-instance”>
<CopyProfile>true</CopyProfile>
<TimeZone>Central Standard Time</TimeZone>
<ComputerName>CFSL-14R-</ComputerName>
</component>
<CopyProfile> is set to true – meaning that whatever you do on the administrator profile (audit mode) such as desktop icons, wallpaper, themes, etc. will become default to other accounts. While <ComputerName> is self-explanatory.
